Mastering Partitioned Tables in SQL Server: A Guide to Efficient Data Management

Partitioned tables in SQL Server can significantly enhance the performance and manageability of large datasets. This approach involves splitting a table into smaller, more manageable pieces called partitions. Each partition holds a subset of the data based on a specified column, known as the partition key. This structure allows for improved performance, easier data management, and more efficient maintenance operations.
In this guide, we will walk through setting up partition functions, schemes, and executing partition switches to manage your data effectively. We’ll cover creating a partitioned table, switching partitions in and out, and practical scenarios for using this feature.
Key Concepts
- Partition Key: This is the column used to determine how data is divided among partitions. Commonly, this is a date or an identifier that naturally segments the data.
- Partitions: Each partition is a separate segment of the table that can be managed independently. For example, you might partition sales data by year, with each year in its own partition.
- Partition Function: This defines the logic for dividing the data. It specifies how SQL Server should map rows to partitions based on the partition key.
- Partition Scheme: This defines where each partition is stored. It can distribute partitions across different filegroups, optimizing performance and storage management.
- Logical Structure: A partitioned table appears as a single table to users and applications. However, it’s internally divided into multiple partitions based on specified criteria (the partition key).
- Physical Storage: Each partition can reside in different filegroups. This means that you can optimize performance by placing frequently accessed partitions on faster storage.
Benefits of Partitioning

- Improved Query Performance: Queries that filter on the partition key can run faster because SQL Server can skip entire partitions that don’t need to be scanned.
- Easier Data Management: You can manage partitions independently. For example, you can archive old data by switching a partition out to another table without affecting the rest of the data.
- Optimized Maintenance: Maintenance tasks like index rebuilding or data purging can be performed on individual partitions, reducing the impact on the overall table.
When to Use Partitioned Tables
- Large Datasets: When dealing with tables that have millions of rows, partitioning can improve performance and manageability.
- Regular Data Updates: If your application frequently loads or removes data, partitioning makes it easier to manage these operations efficiently.
- Time-Based Data: Data that is naturally time-based, like logs or sales records, can benefit significantly from partitioning by date ranges.
Important Considerations
- Data Types: Ensure that both tables have identical data types, nullability, and constraints.
- Performance: Partition switching is very fast because it only involves metadata updates. This can greatly enhance data management.
- Transaction Log: Since switching is a metadata operation, it minimizes logging overhead compared to bulk inserts or deletes.
- Permissions: Make sure you have the necessary permissions (ALTER TABLE) on both tables.
Now that you know for what partitioned tables are and what they are used for, i’ll show you an example of how data is distributed across the partitions and how could you execute switch out and in the partition using a staging table. So let’s do it!
Setup Enviromment
In our environment, we will use a unique filegroup partitioned by year for two main reasons: First, it simplifies explanation, and second, it is the most commonly used partitioning method in similar environments
Let’s do it together!
Step 1: Adding some Filegroups
ALTER DATABASE AdventureWorks2019 ADD FILEGROUP fg_2021
ALTER DATABASE AdventureWorks2019 ADD FILEGROUP fg_2022
ALTER DATABASE AdventureWorks2019 ADD FILEGROUP fg_2023
ALTER DATABASE AdventureWorks2019 ADD FILEGROUP fg_2024
Step 2: Adding a newfresh File to Filegroup
ALTER DATABASE AdventureWorks2019
ADD FILE
    (NAME = 'fg_2021_data', FILENAME = 'D:\DATA\SQL_FG\fg_2021_data.mdf')
    TO FILEGROUP fg_2021;

ALTER DATABASE AdventureWorks2019
ADD FILE
    (NAME = 'fg_2022_data', FILENAME = 'D:\DATA\SQL_FG\fg_2022_data.mdf')
    TO FILEGROUP fg_2022;

ALTER DATABASE AdventureWorks2019
ADD FILE
    (NAME = 'fg_2023_data', FILENAME = 'D:\DATA\SQL_FG\fg_2023_data.mdf')
    TO FILEGROUP fg_2023;

ALTER DATABASE AdventureWorks2019
ADD FILE
    (NAME = 'fg_2024_data', FILENAME = 'D:\DATA\SQL_FG\fg_2024_data.mdf')
    TO FILEGROUP fg_2024;
Step 3: Creating the Partition Function
USE AdventureWorks2019
GO
CREATE PARTITION FUNCTION pf_SalesDate (DATE)
AS RANGE LEFT FOR VALUES
    ('2021-01-01', '2022-01-01', '2023-01-01', '2024-01-01');
Step 4: Creating the Partition Schema
CREATE PARTITION SCHEME ps_SalesDate
AS PARTITION pf_SalesDate
TO ([fg_2021], [fg_2022], [fg_2023], [fg_2024],[primary]);
Step 5: Creating our partitioned table
CREATE TABLE SalesOrderPartitioned
(
    SalesOrderID INT NOT NULL,
    SalesOrderDate DATE NOT NULL,
    TotalDue MONEY
)
ON ps_SalesDate(SalesOrderDate);  -- Partition the table by SalesOrderDate

-- Create the primary key including SalesOrderDate as part of the key
CREATE CLUSTERED INDEX IDX_SalesOrderDateClust
ON SalesOrderPartitioned (SalesOrderDate);

-- Create a non-clustered index on SalesOrderDate
CREATE NONCLUSTERED INDEX IDX_SalesOrderDate
ON SalesOrderPartitioned (SalesOrderDate);

-- Create a non-clustered index on TotalDue with included columns
CREATE NONCLUSTERED INDEX IDX_TotalDue_Include
ON SalesOrderPartitioned (TotalDue)
INCLUDE (SalesOrderID, SalesOrderDate);
Now we have a partitioned table! Let’s insert some rows to see and understand how our partitioned table will work on!.
USE AdventureWorks2019
GO
-- Inserting for 2021
DECLARE @Year INT = 2021;
DECLARE @SalesOrderDate DATE;
DECLARE @i INT = 1;

SET @SalesOrderDate = CAST(CAST(@Year AS VARCHAR(4)) + '-01-01' AS DATE);
BEGIN
    SET @i = 1;
    WHILE @i <= 10
    BEGIN
        INSERT INTO SalesOrderPartitioned (SalesOrderID, SalesOrderDate, TotalDue)
        VALUES
        (
            1000 + @i,  -- Example SalesOrderID (just a simple incremented value)
            @SalesOrderDate,  -- SalesOrderDate set to the 1st Jan of 2021
            ROUND(RAND() * 1000, 2)  -- Random TotalDue value between 0 and 1000
        );
        SET @i = @i + 1;
    END
END

-- Inserting for 2022
SET @Year = 2022;
SET @SalesOrderDate = CAST(CAST(@Year AS VARCHAR(4)) + '-01-01' AS DATE);
BEGIN
    SET @i = 1;
    WHILE @i <= 10
    BEGIN
        INSERT INTO SalesOrderPartitioned (SalesOrderID, SalesOrderDate, TotalDue)
        VALUES
        (
            2000 + @i,  -- Example SalesOrderID (starting from 2001 for 2022)
            @SalesOrderDate,  -- SalesOrderDate set to the 1st Jan of 2022
            ROUND(RAND() * 1000, 2)  -- Random TotalDue value between 0 and 1000
        );
        SET @i = @i + 1;
    END
END

-- Inserting for 2023
SET @Year = 2023;
SET @SalesOrderDate = CAST(CAST(@Year AS VARCHAR(4)) + '-01-01' AS DATE);
BEGIN
    SET @i = 1;
    WHILE @i <= 10
    BEGIN
        INSERT INTO SalesOrderPartitioned (SalesOrderID, SalesOrderDate, TotalDue)
        VALUES
        (
            3000 + @i,  -- Example SalesOrderID (starting from 3001 for 2023)
            @SalesOrderDate,  -- SalesOrderDate set to the 1st Jan of 2023
            ROUND(RAND() * 1000, 2)  -- Random TotalDue value between 0 and 1000
        );
        SET @i = @i + 1;
    END
END

-- Inserting for 2024
SET @Year = 2024;
SET @SalesOrderDate = CAST(CAST(@Year AS VARCHAR(4)) + '-01-01' AS DATE);
BEGIN
    SET @i = 1;
    WHILE @i <= 10
    BEGIN
        INSERT INTO SalesOrderPartitioned (SalesOrderID, SalesOrderDate, TotalDue)
        VALUES
        (
            4000 + @i,  -- Example SalesOrderID (starting from 4001 for 2024)
            @SalesOrderDate,  -- SalesOrderDate set to the 1st Jan of 2024
            ROUND(RAND() * 1000, 2)  -- Random TotalDue value between 0 and 1000
        );
        SET @i = @i + 1;
    END
END
Let’s check our data partitioned:
DECLARE @Table sysname
SET @Table = 'SalesOrderPartitioned'

SELECT  pf.name AS pf_name ,
        ps.name AS partition_scheme_name ,
        p.partition_number ,
        ds.name AS partition_filegroup ,
        pf.type_desc AS pf_type_desc ,
        pf.fanout AS pf_fanout ,
        pf.boundary_value_on_right ,
        OBJECT_NAME(si.object_id) AS object_name ,
        rv.value AS range_value ,
        SUM(CASE WHEN si.index_id IN ( 1, 0 ) THEN p.rows
                    ELSE 0
            END) AS num_rows ,
        SUM(dbps.reserved_page_count) * 8 / 1024. AS reserved_mb_all_indexes ,
        SUM(CASE ISNULL(si.index_id, 0)
                WHEN 0 THEN 0
                ELSE 1
            END) AS num_indexes
FROM    sys.destination_data_spaces AS dds
        JOIN sys.data_spaces AS ds ON dds.data_space_id = ds.data_space_id
        JOIN sys.partition_schemes AS ps ON dds.partition_scheme_id = ps.data_space_id
        JOIN sys.partition_functions AS pf ON ps.function_id = pf.function_id
        LEFT JOIN sys.partition_range_values AS rv ON pf.function_id = rv.function_id
                                                        AND dds.destination_id = CASE pf.boundary_value_on_right
                                                                                    WHEN 0 THEN rv.boundary_id
                                                                                    ELSE rv.boundary_id + 1
                                                                                END
        LEFT JOIN sys.indexes AS si ON dds.partition_scheme_id = si.data_space_id
        LEFT JOIN sys.partitions AS p ON si.object_id = p.object_id
                                            AND si.index_id = p.index_id
                                            AND dds.destination_id = p.partition_number
        LEFT JOIN sys.dm_db_partition_stats AS dbps ON p.object_id = dbps.object_id
                                                        AND p.partition_id = dbps.partition_id
WHERE  OBJECT_NAME(si.object_id)  = @Table
GROUP BY ds.name ,
        p.partition_number ,
        pf.name ,
        pf.type_desc ,
        pf.fanout ,
        pf.boundary_value_on_right ,
        ps.name ,
        si.object_id ,
        rv.value
ORDER BY 3
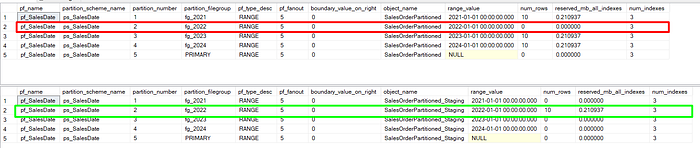
As we can see, our data has been inserted and split across partitions as follows:
- Partition 1: Date ≤ 2021–01–01
- Partition 2: Date > 2021–01–01 ≤ 2022–01–01
- Partition 3: Date > 2022–01–01 ≤ 2023–01–01
- Partition 4: Date > 2023–01–01 ≤ 2024–01–01
- Partition 5 [Primary]: Date > 2024–01–01
Step 6. Switch Data In and Out of Partitions
Switching data between partitioned tables can be done efficiently with the ALTER TABLE SWITCH command. The switch operation moves data between partitions with minimal overhead and without the need for physical data copying.
Switching a Partition:
- Out: Moving a partition from the main partitioned table to another table (e.g., for archiving).
- In: Bringing a partition back into the main partitioned table.
Requirements:
- The destination table must have the same structure (columns and types) as the partitioned table.
- The destination table must also be partitioned using the same partition function.
Switch-Out
If you want to move a set of rows from the partitioned table into a staging table (or another table), you can perform a SWITCH OUT operation.
- Create a staging table
use AdventureWorks2019
go
CREATE TABLE SalesOrderPartitioned_Staging
(
    SalesOrderID INT NOT NULL,
    SalesOrderDate DATE NOT NULL,
    TotalDue MONEY
)
ON ps_SalesDate(SalesOrderDate);

CREATE CLUSTERED INDEX IDX_SalesOrderDateClust
ON SalesOrderPartitioned_Staging (SalesOrderDate);

CREATE NONCLUSTERED INDEX IDX_SalesOrderDate
ON SalesOrderPartitioned_Staging (SalesOrderDate);

CREATE NONCLUSTERED INDEX IDX_TotalDue_Include
ON SalesOrderPartitioned_Staging (TotalDue)
INCLUDE (SalesOrderID, SalesOrderDate);- Checking Partitions data:
DECLARE @Table sysname
SET @Table = 'SalesOrderPartitioned_Staging'

SELECT  pf.name AS pf_name ,
        ps.name AS partition_scheme_name ,
        p.partition_number ,
        ds.name AS partition_filegroup ,
        pf.type_desc AS pf_type_desc ,
        pf.fanout AS pf_fanout ,
        pf.boundary_value_on_right ,
        OBJECT_NAME(si.object_id) AS object_name ,
        rv.value AS range_value ,
        SUM(CASE WHEN si.index_id IN ( 1, 0 ) THEN p.rows
                    ELSE 0
            END) AS num_rows ,
        SUM(dbps.reserved_page_count) * 8 / 1024. AS reserved_mb_all_indexes ,
        SUM(CASE ISNULL(si.index_id, 0)
                WHEN 0 THEN 0
                ELSE 1
            END) AS num_indexes
FROM    sys.destination_data_spaces AS dds
        JOIN sys.data_spaces AS ds ON dds.data_space_id = ds.data_space_id
        JOIN sys.partition_schemes AS ps ON dds.partition_scheme_id = ps.data_space_id
        JOIN sys.partition_functions AS pf ON ps.function_id = pf.function_id
        LEFT JOIN sys.partition_range_values AS rv ON pf.function_id = rv.function_id
                                                        AND dds.destination_id = CASE pf.boundary_value_on_right
                                                                                    WHEN 0 THEN rv.boundary_id
                                                                                    ELSE rv.boundary_id + 1
                                                                                END
        LEFT JOIN sys.indexes AS si ON dds.partition_scheme_id = si.data_space_id
        LEFT JOIN sys.partitions AS p ON si.object_id = p.object_id
                                            AND si.index_id = p.index_id
                                            AND dds.destination_id = p.partition_number
        LEFT JOIN sys.dm_db_partition_stats AS dbps ON p.object_id = dbps.object_id
                                                        AND p.partition_id = dbps.partition_id
WHERE  OBJECT_NAME(si.object_id)  = @Table
GROUP BY ds.name ,
        p.partition_number ,
        pf.name ,
        pf.type_desc ,
        pf.fanout ,
        pf.boundary_value_on_right ,
        ps.name ,
        si.object_id ,
        rv.value
ORDER BY 3
As you can see, no data! MAGIC….! (No Technology)
- Performing a switch out!
Perform a SWITCH OUT operation to move data from the partition for 2022!
USE AdventureWorks2019
GO
ALTER TABLE SalesOrderPartitioned
SWITCH PARTITION 2 TO SalesOrderPartitioned_Staging PARTITION 2
The data from this partition will be moved into the SalesOrderPartitioned_Staging table, but no data copying is performed, making it a very fast operation.
Let’s check our partition data again (use the script on Checking Partitions data step):
WOW! You did your first Switch out!
If you want to move data back into a partitioned table, you can perform a SWITCH IN (are the same, just invert tables hahaha)operation.
USE AdventureWorks2019
GO
ALTER TABLE SalesOrderPartitioned_Staging
SWITCH PARTITION 2 TO SalesOrderPartitioned PARTITION 2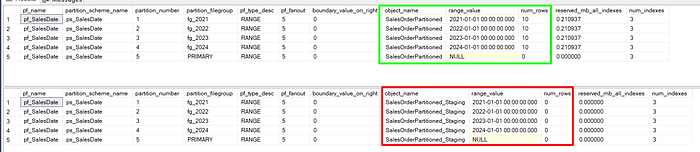
Common cases using Partition Switching
Usually when you have a large dataset that you want to archive monthly. You can switch out the partitions for each month into a separate staging table.
- Create a staging table for archived data.
- Switch out the partition at the end of the month.
- Perform maintenance on the switched-out data as needed.
Conclusion
In conclusion, switching partitions in and out of a partitioned table is a straightforward yet powerful process that significantly enhances data management efficiency. By mastering the setup of partition functions, schemes, and the switching process, you can effectively archive and manage large datasets with minimal overhead. This robust feature allows for improved performance and streamlined database operations in SQL Server. Always ensure to test your commands in a development environment before executing them in production to safeguard your data and maintain operational integrity.